With a modern look and a sleek, slim profile that allows for unimpeded views, cable deck railing systems are becoming increasingly popular. However, their installation can be a bit more challenging than more traditional infills.
Cable deck railings include the top and bottom rails you’re likely familiar with, but feature horizontal infills rather than vertical balusters or pickets. Follow these tips, along with the railing installation guides, to help you identify the parts you need so you can accurately quote and install Fairway cable railings.
Getting Started with Your Cable Deck Railing Installation
Tools Needed for Installation
- Cable Cutter
- 3/16 Hex Head Bit
- Miter Saw
- Drill (set to low speed)
- 3/16″, 7/32″, 7/16″ Drill Bits
- (2) High-Quality 3/8″ Open End Wrenches
- Tape Measure
- T-Bevel for Stair
Whether you’re installing aluminum, composite, or vinyl/pvc railing, you need to start with the railing’s support system. For cable rail, the railing support system is either a wood post that you will sleeve over or Fairway’s Riv Nut post, which is machined to receive fittings. Our cable rail system does not pass through corners or level angles, so a structural post is needed at these points where you will start and stop.
Our rails are available in 6′ and 8′, and our cable is available in 100′ and 500′ coils. Cable infills can have runs up to 40′ with a maximum run of 8′ between posts; however, the cable must be supported by an intermediate baluster (sold separately) every 48″ for both level and stair runs. So even on a 5-6-foot cavity, you need an intermediate baluster. On longer, straight runs where the cable can span 40′, you will need to carry the cable rail through the posts, called pass-through posts, before reaching the end or corner termination posts.
Layout and Design Planning for Your Cable Rail Install
Next, apply the above information to mark up your deck design drawing and calculate how much product you will need.
- Since Fairway’s cable does not pass through any corners or angles, label these points as your “termination posts.”
- Mark any posts in the run that the cable will pass through as “pass-through posts.”
- Identify runs that exceed 48″ and in the center of those runs, mark a spot for your “intermediate balusters.”
- Finally, calculate the total cable footage to determine how many cable coils you need for the job. Fairway’s cable infills on a 36″-high railing system are designed for a top and bottom rail with nine rows of cable. Our 42-inch-high railing systems are designed for a top and bottom rail with 11 rows of cable.
Installing the Cable Rail and Components
After you’ve leveled and installed all framework, including rails and intermediate balusters, you can begin installing the cable rail starting with the fittings that secure the cable. Please follow the installation instructions provided with your particular railing for framework installation, and make sure your top rails are 36″ high or greater. Your termination post sleeves must have pre-routed holes enlarged with a 7/16″ drill bit to receive cable railing tensioning fittings.
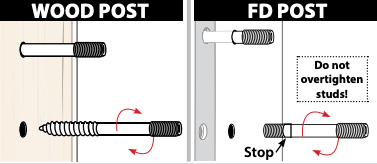
For wood posts, you will need lag screws to secure the fitting. You may require both level railing lag screws and stair/angle railing lag screens. For level applications, insert the cable rail lag screws into the wood post and tighten with a 3/16″ hex wrench until lag threads are buried in the post. For stairs, insert and hand tighten using the fitting as leverage.
For Riv Nut structural posts, you will need cable rail studs. You may require both level railing studs and stair/angle railing studs for your project. With the stop toward the post, hand turn the cable rail machine into the Riv Nut Post to start threads, and then tighten with a 3/16″ hex wrench. For stairs, insert and hand tighten using the fitting as leverage. Do not overtighten studs.
Since our systems are designed using nine rows of cable, you will receive 18 pieces per container—enough components for both ends of one run. If you’re working with a 42″ system, you can purchase all cable components à la carte.
Next, install tensioning and non-tensioning cable rail fittings. Insert the cable into the non-tensioning fittings, run the cable through intermediate posts, and pull the cable to tensioning fittings and cut the cable with cable cutters at the witness line indicated on the tensioning cable rail fitting.

Use high-quality 3/8″ open-end wrenches to tension cable infill per the pattern below.
For more specifics on cable rail stair installation, view our Horizontal Cable Installation Quick Guide.
With these tips, you should be able to quote projects, order the components you need, and install cable rail more accurately. Envision makes it easier with pre-drilled post sleeves and by including necessary hardware and brackets to make the connection to posts.
As always, connect with an Envision Outdoor Living representative for installation questions or help with your particular application.